Packaging your game or program
An ADF image can be generated from a packaging.json file created at the root folder of your project using Ctrl-F4 (Win, Linux) or Cmd-F4(MacOS) :
{
    "supports": [
        {
            "type": "adf",
            "boot": true,
            "supportName": "Blower",
            "exeToLaunch": "blower.exe",
            "includeDiskFontLibrary": true,
            "includeMathTransLibrary": true,
            "filesToIncludeOnRoot": [
                "blower.exe",
                "blower.exe.info"
            ],
            "foldersToInclude": [
                "assets"
            ]
        }
    ]
}
Each support entry (multi disk and multi support) support the following parameters (all mandatory) :
type : adf
boot : true to create a bootable disk (first disk of the game/app), false for any other disk.
supportName: name of your adf, floppy, cdrom. It's the name that will be shown by Workbench. Choose a different name for each support entry of the config file.
exeToLaunch: the exe to launch in startup sequence.
includeDiskFontLibrary: for bootable support, true if you do disk access in your software.
includeMathTransLibrary: for bootable support, true if you do advanced mathematical as sinus or cosinus.
filesToIncludeOnRoot: list all the files to include on the root folder of the support, typically your executable and .info files.
filesToIncludeOnRoot: list all the folders to include on the root folder of the support, typically your assets. All sub-folders are included automatically.
At the end of the process, your ADF file is available in the build folder.
This is an experimental feature. Generate ISO for CDTV and CD32 from a packaging.json file created at the root folder of your project using Ctrl-F3 (Win, Linux) or Cmd-F3(MacOS) :
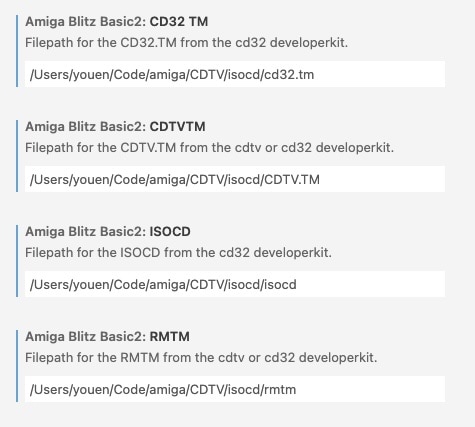
Before you start you need extra files that are under copyright from the CDTV and CD32 Commodore Developer Kit (dig into google and eababime.net forums) :
- CDTV.TM file (from CDTV and CD32 dev kit)
- CD32.TM file (from CD32 dev kit)
- RMTM executable file (from CDTV dev kit)
- isocd executable file (from CD32 dev kit)
You need to enter the path of these files into the extension settings :
{
    "supports": [
        {
            "type": "cdtv",
            "boot": true,
            "supportName": "Blower",
            "supportVolumeSet": "",
            "supportPublisher": "Micrix Production",
            "supportPreparer": "",
            "supportApplication": "",
            "exeToLaunch": "blower.exe",
            "includeDiskFontLibrary": true,
            "includeMathTransLibrary": true,
            "filesToIncludeOnRoot": [
                "blower.exe",
                "blower.exe.info"
            ],
            "foldersToInclude": [
                "assets"
            ]
        },
        {
            "type": "cd32",
            "boot": true,
            "supportName": "Blower_CD32",
            "supportVolumeSet": "",
            "supportPublisher": "Micrix Production",
            "supportPreparer": "",
            "supportApplication": "",
            "exeToLaunch": "blower.exe",
            "includeDiskFontLibrary": true,
            "includeMathTransLibrary": true,
            "filesToIncludeOnRoot": [
                "blower.exe",
                "blower.exe.info"
            ],
            "foldersToInclude": [
                "assets"
            ]
        }
    ]
}supportVolumeSet: (optional) Identifier of the volume set of which this volume is a member.
supportPublisher: (optional) The volume publisher
supportPreparer: (optional) The identifier of the person(s) who prepared the data for this volume.
supportApplication: (optional) Identifies how the data are recorded on this volume.
More information on https://wiki.osdev.org/ISO_9660
The iso packaging works this way :
- it first prepares a folder for the iso
- it then generates and copies the ISO Layout for isocd
- it launches the isocd command line in UAE and then closes isocd
- your iso will be available in the build folder
You can generate a ZIP archive for Hard Disk Installation from a packaging.json file created at the root folder of your project using Ctrl-F2 (Win, Linux) or Cmd-F2(MacOS) :
{
    "supports": [
        {
            "type": "zip",
            "supportName": "Blower_HD",
            "folderIcon": "Blower_HD.info",
            "exeToLaunch": "blower.exe",
            "filesToIncludeOnRoot": [
                "blower.exe",
                "blower.exe.info"
            ],
            "foldersToInclude": [
                "assets"
            ]
        }
    ]
}
Each support entry (multi disk and multi support) support the following parameters (all mandatory) :
folderIcon: icon path (.info) for the containing folder inside the zip file. The folder of your game in your hard disk will appear with this icon.
At the end of the process, your ZIP archiveis available in the build folder.